1.登录超时控制
一般登录状态都有一个超时时间,超过时间后登录状态会失效。目前我们给用户颁发的JWT令牌并未设置超时时间,也就是说用户只要不关闭浏览器,登录状态就一直有效。
那么,我们该如何实现登录超时控制呢?
1.1.思路分析
登录超时控制有两种实现思路:
- 思路一:在颁发给用户的JWT中设置超时时间,每次校验JWT顺便校验时间
- 思路二:在服务端记录用户登录超时时间,即便jwt有效,服务端过期依然算登录失效
两种思路都可以,我们选择哪一种呢?
思路一的优点是过期时间在JWT中就有,无需服务端记录,减轻服务端压力;缺点是由于JWT的签名机制,一旦生成后不能修改,所以登录续期实现起来很麻烦。
思路二的优点是过期时间由服务端记录,控制用户的登录过期、续期、登出都很方便;缺点是给服务端带来了存储压力。
两种方案都可以,本例中我们采用思路二。
因此,这里我们需要完成两部分内容:
- 登录时配置超时时间:
- 用户登录时记录JWT,并设置超时时间到redis中,采用string数据类型
- key是用户id,值是JWT中的jti,并且设置过期时间,比如30分钟
- 用户访问时更新超时时间
1.2.新的登录、验证逻辑
按照之前的分析,用户登录时,就需要把JWT中的jti信息记录到redis中,并设置过期时间。因此需要修改登录逻辑,流程图:
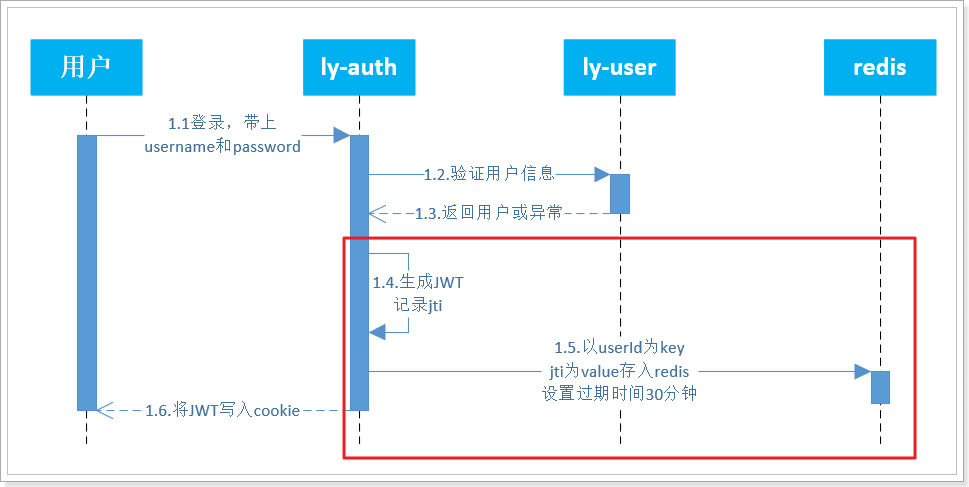
其中的1.4和1.5部分是新加入的逻辑。
另外,验证登录时,也需要验证redis中的JTI,如果到期则JTI在redis中就不存在了,验证流程如下:
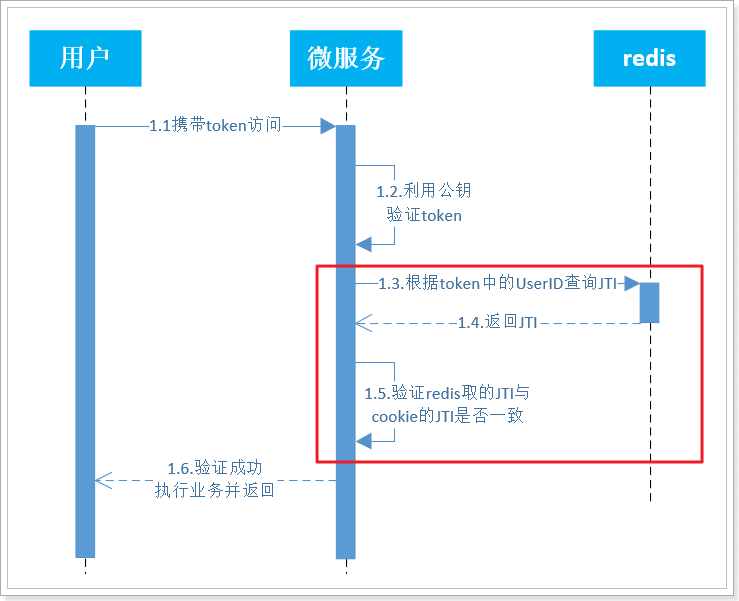
其中的1.3、1.4、1.5是新增的流程。
1.2.1.定义Redis常量类
存入Redis时,需要使用到如:key的前缀、过期时间、等数据。我们在ly-auth-pojo的com.leyou.auth.constants包中定义一个常量类,记录这些值:
1
2
3
4
5
6
7
8
9
10
11
12
13
| package com.leyou.auth.constants;
public class RedisConstants {
public static final String JTI_KEY_PREFIX = "auth:login:uid:";
public static final Integer TOKEN_EXPIRE_SECONDS = 1800;
}
|
1.2.2.修改JwtUtils
我们可以把设置过期时间的代码直接写到JwtUtils中的createJwt()方法中,然后验证过期时间的代码写到JwtUtils的parseJwt()方法中。
首先在修改ly-auth-pojo的pom文件中引入redis的依赖:
1
2
3
4
5
|
<dependency>
<groupId>org.springframework.boot</groupId>
<artifactId>spring-boot-starter-data-redis</artifactId>
</dependency>
|
修改ly-auth-pojo中com.leyou.auth.pojo包下的JwtUtils:
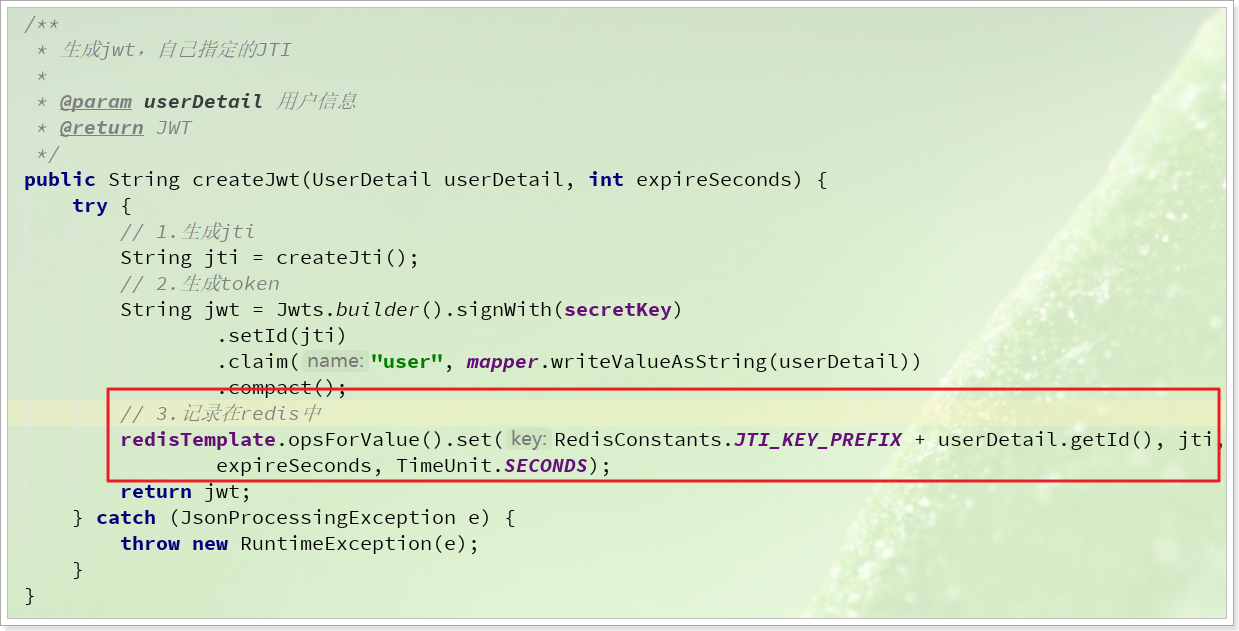
登录时,存储到redis的逻辑:
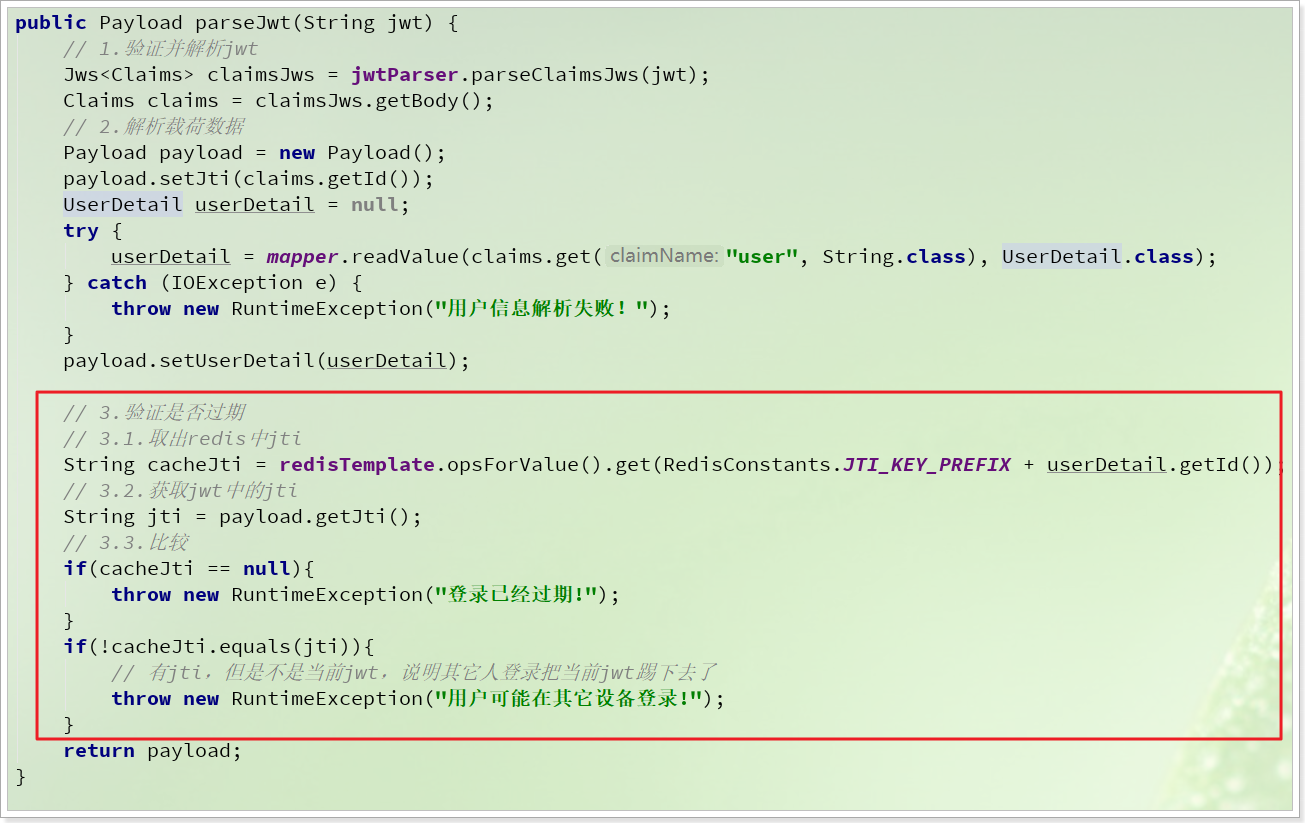
验证JWT时,验证是否超时的逻辑:
完整的JwtUtils代码:
1
2
3
4
5
6
7
8
9
10
11
12
13
14
15
16
17
18
19
20
21
22
23
24
25
26
27
28
29
30
31
32
33
34
35
36
37
38
39
40
41
42
43
44
45
46
47
48
49
50
51
52
53
54
55
56
57
58
59
60
61
62
63
64
65
66
67
68
69
70
71
72
73
74
75
76
77
78
79
80
81
82
83
84
85
86
87
88
89
90
91
92
93
94
95
96
97
98
99
100
101
102
103
104
105
106
107
108
109
110
111
112
113
114
115
116
117
118
119
120
121
| package com.leyou.auth.utils;
import com.fasterxml.jackson.core.JsonProcessingException;
import com.fasterxml.jackson.databind.ObjectMapper;
import com.leyou.auth.constants.RedisConstants;
import com.leyou.auth.dto.Payload;
import com.leyou.auth.dto.UserDetail;
import io.jsonwebtoken.Claims;
import io.jsonwebtoken.Jws;
import io.jsonwebtoken.JwtParser;
import io.jsonwebtoken.Jwts;
import io.jsonwebtoken.security.Keys;
import org.apache.commons.lang3.StringUtils;
import org.springframework.data.redis.core.StringRedisTemplate;
import javax.crypto.SecretKey;
import java.io.IOException;
import java.nio.charset.Charset;
import java.util.UUID;
import java.util.concurrent.TimeUnit;
public class JwtUtils {
private final JwtParser jwtParser;
private final SecretKey secretKey;
private final StringRedisTemplate redisTemplate;
private final static ObjectMapper mapper = new ObjectMapper();
public JwtUtils(String key, StringRedisTemplate redisTemplate) {
secretKey = Keys.hmacShaKeyFor(key.getBytes(Charset.forName("UTF-8")));
this.redisTemplate = redisTemplate;
this.jwtParser = Jwts.parserBuilder().setSigningKey(secretKey).build();
}
public String createJwt(UserDetail userDetail) {
return createJwt(userDetail, RedisConstants.TOKEN_EXPIRE_SECONDS);
}
public String createJwt(UserDetail userDetail, int expireSeconds) {
try {
String jti = createJti();
String jwt = Jwts.builder().signWith(secretKey)
.setId(jti)
.claim("user", mapper.writeValueAsString(userDetail))
.compact();
redisTemplate.opsForValue().set(RedisConstants.JTI_KEY_PREFIX + userDetail.getId(), jti,
expireSeconds, TimeUnit.SECONDS);
return jwt;
} catch (JsonProcessingException e) {
throw new RuntimeException(e);
}
}
public Payload parseJwt(String jwt) {
Jws<Claims> claimsJws = jwtParser.parseClaimsJws(jwt);
Claims claims = claimsJws.getBody();
Payload payload = new Payload();
payload.setJti(claims.getId());
UserDetail userDetail = null;
try {
userDetail = mapper.readValue(claims.get("user", String.class), UserDetail.class);
} catch (IOException e) {
throw new RuntimeException("用户信息解析失败!");
}
payload.setUserDetail(userDetail);
String cacheJti = redisTemplate.opsForValue().get(RedisConstants.JTI_KEY_PREFIX + userDetail.getId());
String jti = payload.getJti();
if(cacheJti == null){
throw new RuntimeException("登录已经过期!");
}
if(!cacheJti.equals(jti)){
throw new RuntimeException("用户可能在其它设备登录!");
}
return payload;
}
private String createJti() {
return StringUtils.replace(UUID.randomUUID().toString(), "-", "");
}
}
|
1.2.3.引入Redis配置
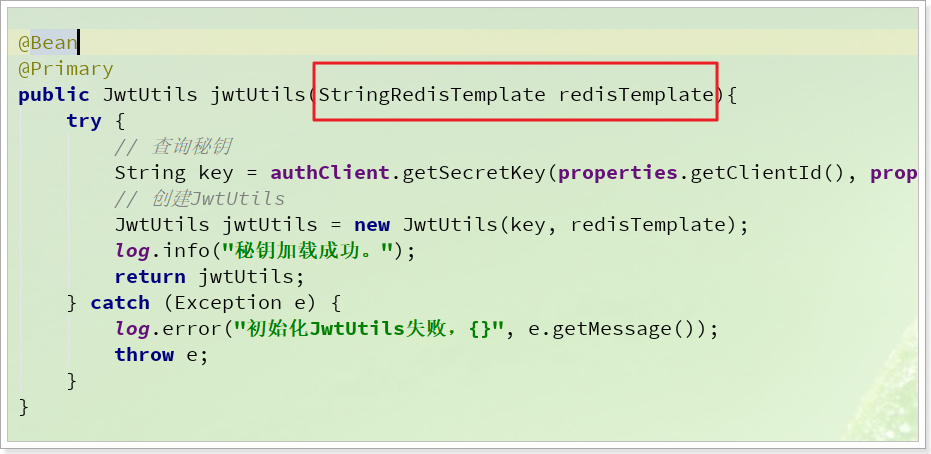
因为JwtUtils中用到了StringRedisTemplate,因此我们需要在注册JwtUtils的时候注入。
修改ly-auth-api中的AuthConfiguration类:
完整代码:
1
2
3
4
5
6
7
8
9
10
11
12
13
14
15
16
17
18
19
20
21
22
23
24
25
26
27
28
29
30
31
32
33
34
35
36
37
38
39
40
41
42
43
| package com.leyou.auth.config;
import com.leyou.auth.client.AuthClient;
import com.leyou.auth.utils.JwtUtils;
import lombok.extern.slf4j.Slf4j;
import org.springframework.boot.autoconfigure.condition.ConditionalOnProperty;
import org.springframework.boot.context.properties.EnableConfigurationProperties;
import org.springframework.context.annotation.Bean;
import org.springframework.context.annotation.Configuration;
import org.springframework.context.annotation.Primary;
import org.springframework.data.redis.core.StringRedisTemplate;
@Slf4j
@Configuration
@ConditionalOnProperty(prefix = "ly.auth", name = {"clientId", "secret"})
@EnableConfigurationProperties(ClientProperties.class)
public class AuthConfiguration {
private AuthClient authClient;
private ClientProperties properties;
public AuthConfiguration(AuthClient authClient, ClientProperties properties) {
this.authClient = authClient;
this.properties = properties;
}
@Bean
@Primary
public JwtUtils jwtUtils(StringRedisTemplate redisTemplate){
try {
String key = authClient.getSecretKey(properties.getClientId(), properties.getSecret());
JwtUtils jwtUtils = new JwtUtils(key, redisTemplate);
log.info("秘钥加载成功。");
return jwtUtils;
} catch (Exception e) {
log.error("初始化JwtUtils失败,{}", e.getMessage());
throw e;
}
}
}
|
修改ly-auth-service中的JwtConfig类:
1
2
3
4
5
6
7
8
9
10
11
12
13
14
15
16
17
18
19
20
21
22
23
24
25
26
27
| package com.leyou.auth.config;
import com.leyou.auth.utils.JwtUtils;
import org.springframework.beans.factory.annotation.Value;
import org.springframework.context.annotation.Bean;
import org.springframework.context.annotation.Configuration;
import org.springframework.data.redis.core.StringRedisTemplate;
import org.springframework.security.crypto.bcrypt.BCryptPasswordEncoder;
import org.springframework.security.crypto.password.PasswordEncoder;
@Configuration
public class JwtConfig {
@Value("${ly.jwt.key}")
private String key;
@Bean
public JwtUtils jwtUtils(StringRedisTemplate redisTemplate){
return new JwtUtils(key, redisTemplate);
}
@Bean
public PasswordEncoder passwordEncoder(){
return new BCryptPasswordEncoder();
}
}
|
1.3.配置Redis地址
现在,我们需要在用到JwtUtils的地方都引入redis的配置,包括:ly-auth-service和ly-user-service。
修改ly-auth-service中的application.yml文件,添加redis配置:application.yml
1
2
3
4
| spring:
redis:
host: ly-redis
|
修改ly-user-service中的application.yml文件,添加redis配置:
1
2
3
4
| spring:
redis:
host: ly-redis
|
1.4.重启测试
重启ly-auth-service和ly-user-service,再次登录,可以看到redis中已经写入数据:

2.刷新登录时间
我们给JWT设置了过期时间,如果用户登录后超过
2.1.思路分析
我们签发给用户的token是永久有效的,但是Redis的标示只存活30分钟。
当用户登录后,浏览网页时,很快30分钟就会过去,登录失效。用户付款时提示说您尚未登录,这样用户体验会很差。
我们需要做到:
- 只要用户一直访问,则登录状态一直存在,Redis不会过期
- 用户超过30分钟不访问,则登录状态失效
如何实现?
显然,需要在用户每次访问我们的微服务时,都去刷新Redis的缓存即可。
而用户的一切请求都会经过网关Gateway的过滤器,因此我们需要在网关中添加一个过滤器,拦截所有进入的请求,如果是已登录用户的请求,则刷新Redis的超时时间。
如图:
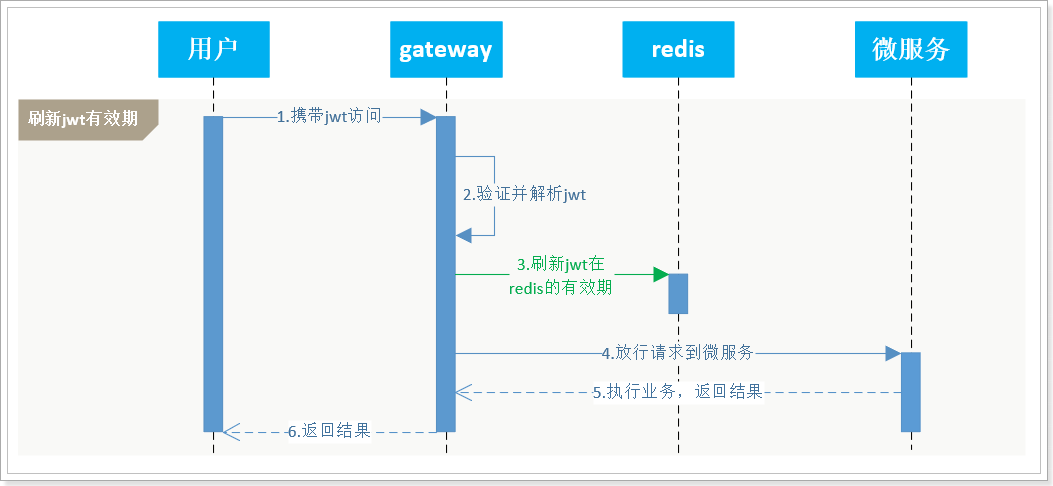
流程解读:
- 1.携带JWT访问:用户浏览浏览器过程中不可避免的会向服务端发送请求,都会携带jwt
- 2.验证并解析jwt:
- 用户一切请求都经过网关,
- 网关拦截并验证jwt是为了判断用户是否登录
- 如果登录则刷新redis,未登录则什么都不做
- 3.刷新jwt在redis的有效期:利用redis的expire命令重置剩余有效期
- 4.放行请求到微服务
- 5.微服务执行自己业务逻辑并返回结果
2.2.代码实现
我们需要做的事情包括:
- 在网关引入
ly-auth-api的相关依赖,确保能使用JwtUtils的功能
- 在网关编写过滤器,拦截用户请求,刷新redis中的jwt有效期
2.2.1.引入依赖
首先,我们在网关ly-gateway中引入ly-auth-api的依赖。
1
2
3
4
5
6
7
8
9
| <dependency>
<groupId>com.leyou</groupId>
<artifactId>ly-auth-api</artifactId>
<version>1.0.0-SNAPSHOT</version>
</dependency>
<dependency>
<groupId>org.springframework.cloud</groupId>
<artifactId>spring-cloud-starter-openfeign</artifactId>
</dependency>
|
修改启动类:
1
2
3
4
5
6
7
8
9
10
11
12
13
14
15
| package com.leyou;
import org.springframework.boot.SpringApplication;
import org.springframework.boot.web.servlet.support.SpringBootServletInitializer;
import org.springframework.cloud.client.SpringCloudApplication;
import org.springframework.cloud.openfeign.EnableFeignClients;
@SpringCloudApplication
@EnableFeignClients
public class LyGateway{
public static void main(String[] args) {
SpringApplication.run(LyGateway.class, args);
}
}
|
在网关中加入配置:
1
2
3
4
| ly:
auth:
clientId: api-gateway
secret: 1234
|
2.2.2.刷新有效期工具
刷新redis有效期的代码,我们也可以添加到JwtUtils中,方便使用。
现在,修改ly-auth-pojo中的JwtUtils类,添加两个方法:
1
2
3
4
5
6
7
8
9
10
11
12
13
14
15
|
public void refreshJwt(Long userId){
refreshJwt(userId, RedisConstants.TOKEN_EXPIRE_SECONDS);
}
public void refreshJwt(Long userId, int expireSeconds){
redisTemplate.expire(RedisConstants.JTI_KEY_PREFIX + userId, expireSeconds, TimeUnit.SECONDS);
}
|
2.2.2.编写过滤器
在ly-gateway中定义过滤器,拦截用户请求,并刷新有效期:
1
2
3
4
5
6
7
8
9
10
11
12
13
14
15
16
17
18
19
20
21
22
23
24
25
26
27
28
29
30
31
32
33
34
35
36
37
38
39
40
41
42
43
44
45
46
47
48
49
50
51
52
53
54
55
56
57
58
59
60
61
62
63
| package com.leyou.gateway.filters;
import com.leyou.auth.constants.JwtConstants;
import com.leyou.auth.dto.Payload;
import com.leyou.auth.dto.UserDetail;
import com.leyou.auth.utils.JwtUtils;
import lombok.extern.slf4j.Slf4j;
import org.springframework.cloud.gateway.filter.GatewayFilterChain;
import org.springframework.cloud.gateway.filter.GlobalFilter;
import org.springframework.core.Ordered;
import org.springframework.http.HttpCookie;
import org.springframework.http.server.reactive.ServerHttpRequest;
import org.springframework.stereotype.Component;
import org.springframework.web.server.ServerWebExchange;
import reactor.core.publisher.Mono;
@Slf4j
@Component
public class LoginFilter implements GlobalFilter, Ordered {
private final JwtUtils jwtUtils;
public LoginFilter(JwtUtils jwtUtils) {
this.jwtUtils = jwtUtils;
}
@Override
public Mono<Void> filter(ServerWebExchange exchange, GatewayFilterChain chain) {
ServerHttpRequest request = exchange.getRequest();
HttpCookie cookie = request.getCookies().getFirst(JwtConstants.COOKIE_NAME);
if (cookie == null) {
return chain.filter(exchange);
}
String jwt = cookie.getValue();
try {
Payload payload = jwtUtils.parseJwt(jwt);
UserDetail userInfo = payload.getUserDetail();
jwtUtils.refreshJwt(userInfo.getId());
log.info("用户{}正在访问{}", userInfo.getUsername(), request.getURI().getPath());
} catch (Exception e) {
log.info("用户未登录");
}
return chain.filter(exchange);
}
@Override
public int getOrder() {
return HIGHEST_PRECEDENCE;
}
}
|
3.退出登录
首页左上角,登录后除了显示用户名,还有一个注销登录按钮:

点击这个按钮,该如何实现退出登录呢?
3.1.思路分析
回想下以前怎么实现的:
- 用户点击退出,发起请求到服务端
- 服务端删除用户session即可
我们现在信息保存在两个地方:cookie中的JWT、Redis中的JTI控制有效期,并没有session这东西,该如何退出?
有同学会想,太简单了,直接删除cookie就可以了。
别忘了,我们设置了httponly,JS无法操作cookie。因此,删除cookie也必须发起请求到服务端,由服务端来删除cookie。
那么,是不是删除了cookie,用户就完成了退出登录呢?
设想一下,删除了cookie,只是让用户在当前浏览器上的jwt删除了,但是这个jwt依然是有效的!
这就是JWT的另外一个缺点了,无法控制jwt让其失效。如果用户提前备份了jwt,那么重新填写到cookie后,登录状态依然有效。
所以,我们不仅仅要让浏览器端清除cookie,而且要让这个cookie中的jwt失效!我们在redis中记录了JTI,因此只要删除了Redis中的JTI信息,这个用户登录凭证就失效了!
综上所述,我们要实现退出登录要做的事情有两件:
- 删除redis中的用户记录JTI
- 删除浏览器cookie
3.2.流程图
退出登录:
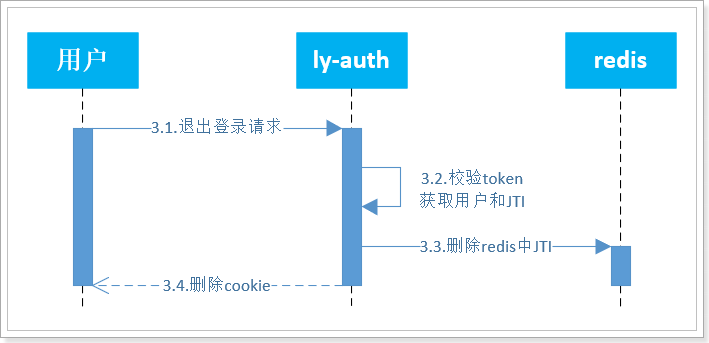
步骤如下:
- 客户发请求到服务端
- 服务验证token,获取用户
- 根据用户id,删除redis中的JTI
- 删除cookie
3.3.业务实现
通过浏览器的请求分析,可以得知退出登录的请求信息:
- 请求方式:POST
- 请求路径:/user/logout
- 请求参数:无,携带cookie
- 返回值:无
在ly-auth-service的com.leyou.auth.web包的UserAuthController中,添加方法:
1
2
3
4
5
6
7
8
9
10
11
|
@PostMapping("logout")
public ResponseEntity<Void> logout(HttpServletRequest request, HttpServletResponse response){
userAuthService.logout(request, response);
return ResponseEntity.noContent().build();
}
|
在ly-auth-service的com.leyou.auth.service包的UserAuthService中,添加方法:
1
| void logout(HttpServletRequest request, HttpServletResponse response);
|
在ly-auth-service的com.leyou.auth.service.impl包的UserAuthServiceImpl中,添加方法:
1
2
3
4
5
6
7
8
9
10
11
12
13
14
15
16
17
18
19
20
21
| @Override
public void logout(HttpServletRequest request, HttpServletResponse response) {
String jwt = CookieUtils.getCookieValue(request, UserTokenConstants.COOKIE_NAME);
Payload payload = null;
try {
payload = jwtUtils.parseJwt(jwt);
} catch (Exception e) {
return;
}
CookieUtils.deleteCookie(JwtConstants.COOKIE_NAME, JwtConstants.DOMAIN, response);
UserDetail userDetail = payload.getUserDetail();
redisTemplate.delete(RedisConstants.JTI_KEY_PREFIX + userDetail.getId());
}
|
4.面试常见问题
4.1.Jwt和Spring Security的对比:
JWT的:
优点:
- 无需在服务端存储用户数据,减轻服务端压力
- 轻量级,json风格,比较简单
- 跨语言
- 有利于水平扩展
缺点:
- token一旦签发,无法修改
- 无法更新token有效期,用户登录状态刷新难以实现
- 无法销毁一个token,服务端不能对用户状态进行绝对控制
- 不包含权限控制
SpringSecurity:
优点:
- 用户信息保存在服务端,服务端可以对用户状态绝对控制
- 基于Spring,无缝整合,修改登录逻辑,其实就是添加过滤器
- 整合权限管理
缺点:
- 限定了语言
- 实现复杂,基于一连串的过滤器链
- 需要在服务端保存用户信息,增加服务端压力
- 依赖于tomcat的HttpSession、如果是分布式项目,session不共享,登录失效,需要借助于SpringSession,实现共享session效果(利用redis代替tomcat的session)
4.2.登录控制问题
你们使用JWT做登录凭证,如何解决token注销问题
答:jwt的缺陷是token生成后无法修改,因此无法让token失效。只能采用其它方案来弥补,基本思路如下:
1)用户登录后,生成JWT,其中包含用户身份
2)以用户id为key,把JWT的id存入redis,只有redis中有id的JWT,才是有效的JWT
3)并且给Redis设置有效期,有效期到自动删除
4)退出登录时,把ID从Redis删除即可
怎么解决登录超时后的登录续签问题?
答:判断登录是否超时的标准是redis,而不是JWT,因此每次用户访问网关,我们都会刷新redis的数据有效期,保证登录状态不断。
如何解决异地登录或跨设备登录问题?
答:
方案一:不允许多端登录
如果账户在第二个设备登录,自然会将redis中的JWT覆盖,那么之前的登录凭证就成了无效凭证。
方案二:允许多端登录
存入redis时,redis的类型可以选择set,这样一个用户可以具备多个JWT的id,实现多端登录。
4.3.cookie安全问题
4.4.权限问题
如何完成权限校验的?
- 首先我们有权限管理的服务,管理用户的各种权限,及可访问路径等
- 在网关中利用过滤器,拦截一切请求,在过滤器中,解析和验证jwt,获取用户身份,查询用户权限,判断用户身份可以访问当前路径
4.5.跨域登录问题
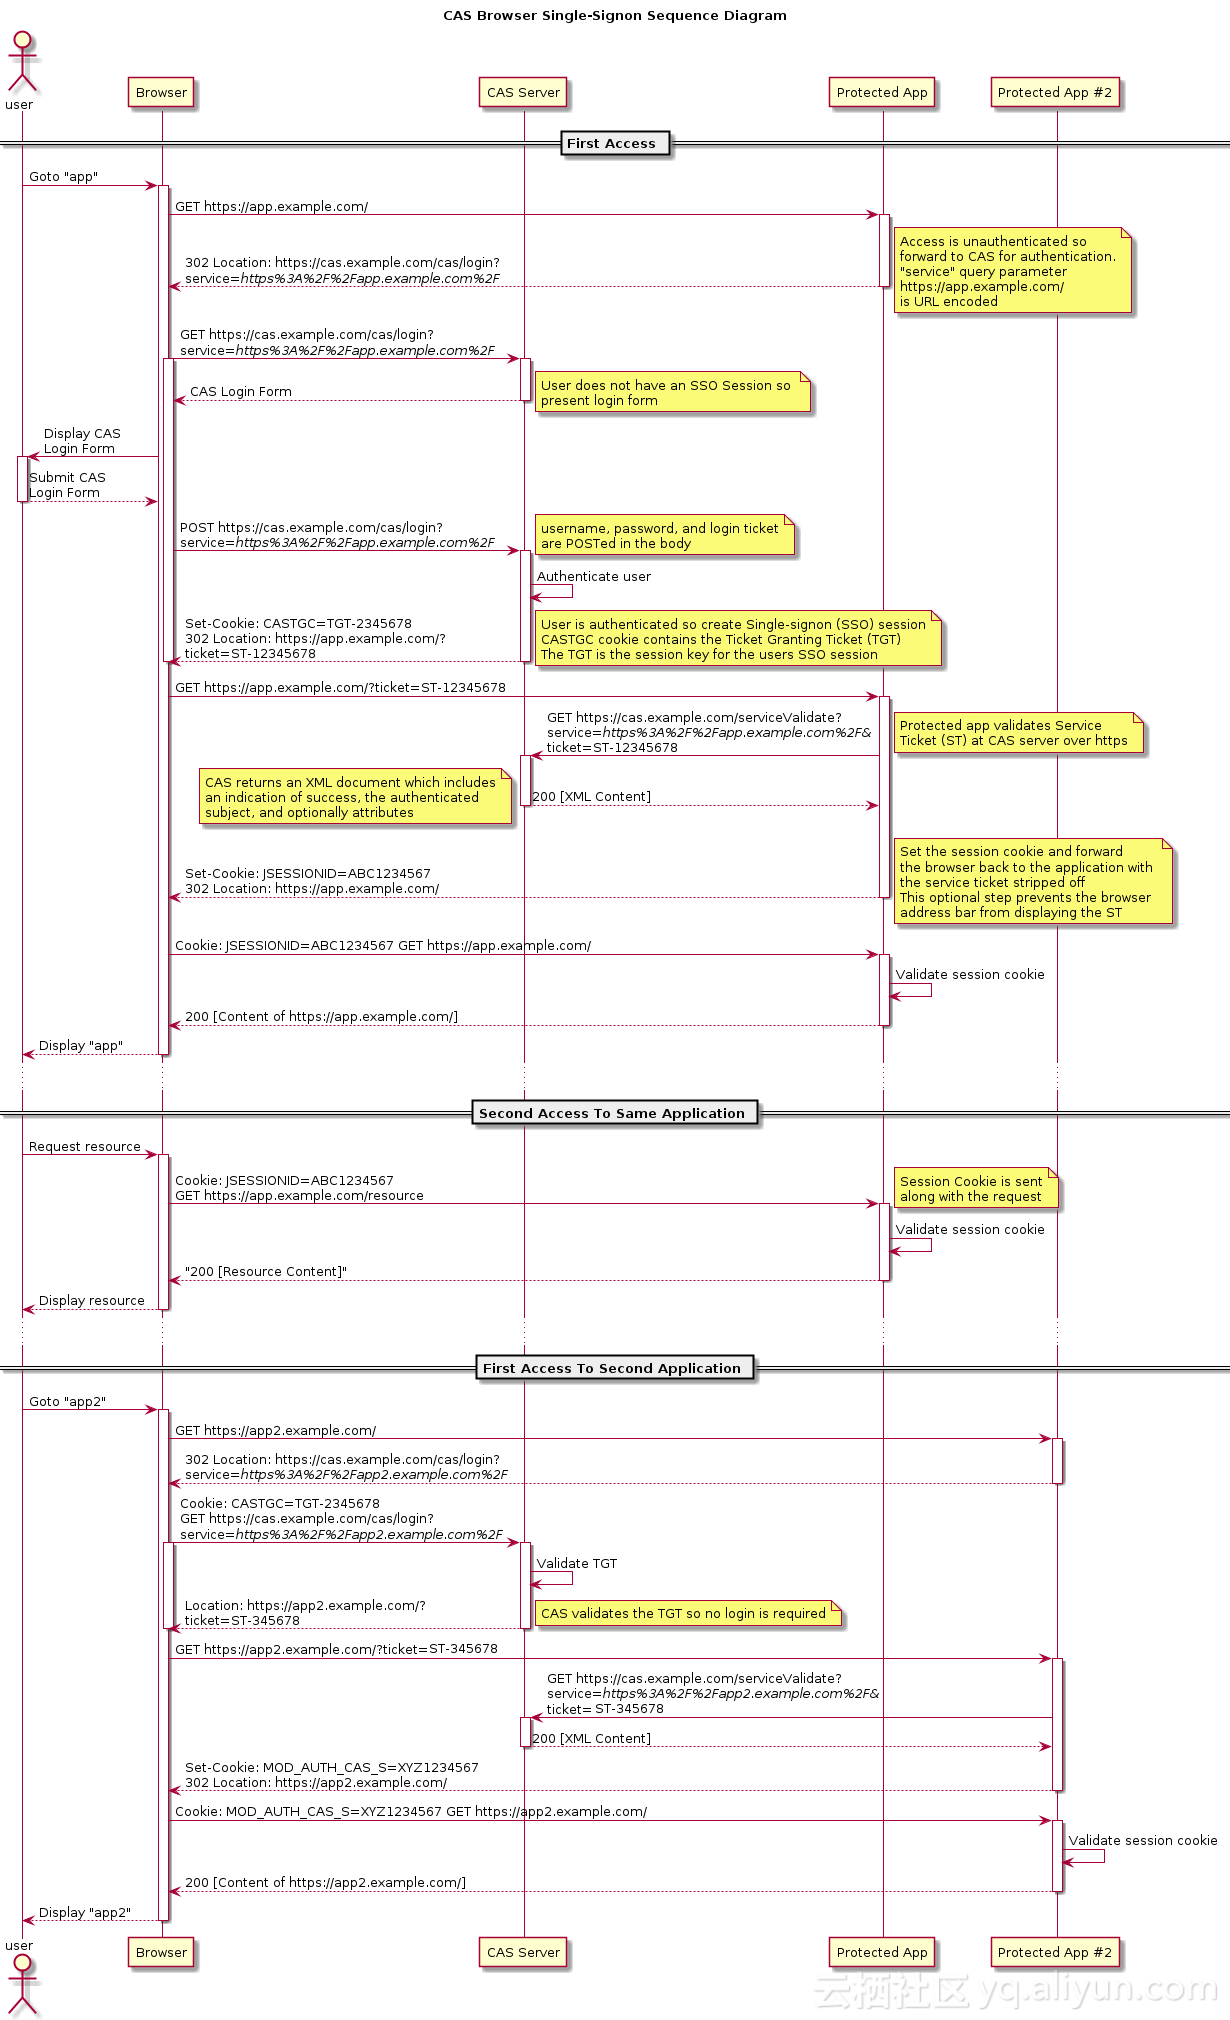
单点登录,顾名思义:在分布式服务中,用户只需要在一处登录,即可在各个受信任的服务器之间,共享登录状态,称为单点登录。
任何登录都离不开cookie,如果cookie无法使用或共享,就会导致登录凭证无法共享,导致登录状态无法共享。例如因为跨域名的多个服务,其cookie不可共享,导致登录失效。
因此实现单点登录有多种方式,其区别就在于是否能解决跨域登录
- 同域名单点登录
- 分布式服务共享二级域名,二级以上域名不同,此时cookie可以共享。解决思路:
- 跨域单点登录
- 服务二级域名就不同,导致cookie无法共享,解决办法:
CAS原理图:
5.MongoDB
后续购物车功能我们计划使用MongoDB服务器,那么MongoDB该如何使用呢?
大家参考课前资料提供的文档:


